1. Diagram
Packing list
| H3S | 1 unit | Charger | 1 piece |
| Instruction | 1 unit | Accessory | 1 set |
Packing list
| H3S | 1 unit | Charger | 1 piece |
| Instruction | 1 unit | Accessory | 1 set |
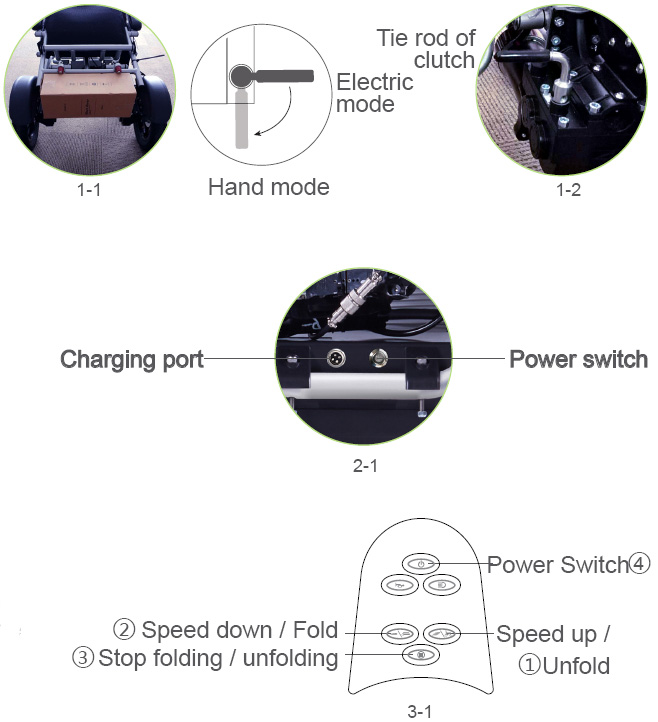
1.Take out the accessory box at the rear of the wheelchair
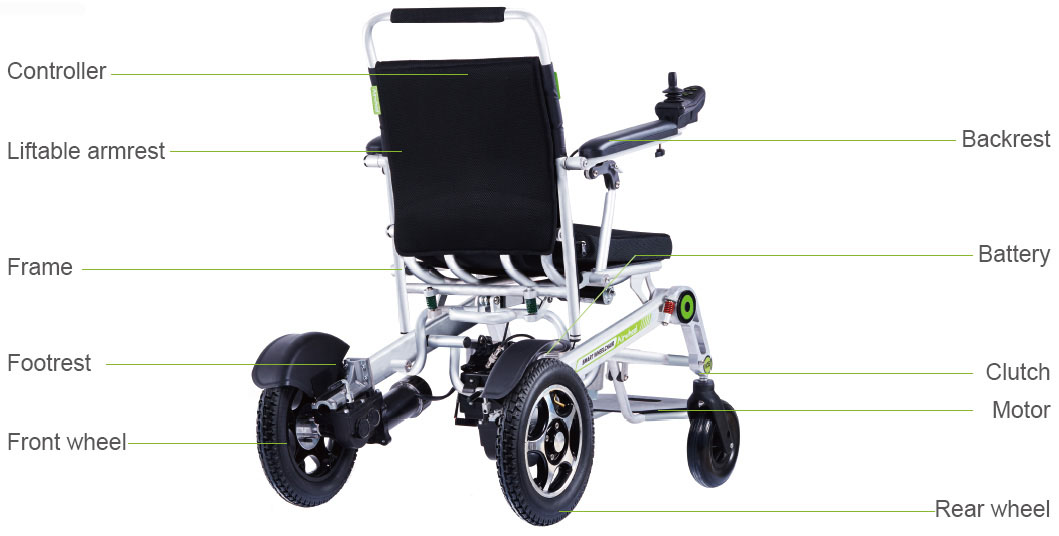
Open the wheelchair carton, take out the clutch wheelchair and place it gently on the floor, then take out the accessory box at the rear of the wheelchair (see Picture1-1) and remove the cardboard near the motor lock. Turn the motor lock to drive mode (see Picture1-2). Contents in the paper box: a Charger, controller, rear stand, user manual, plastic tie and assembling tools etc.
2.Turn on the main power
Turn on the main power when finished step one. The power switch is located at the rear of the battery box (see Picture2-1).
3.Take out the controller and unfold the wheelchair
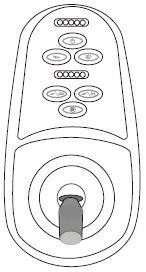
Take out the controller from the accessory box, make sure the main power on the battery box is turned on while the power switch on the controller is not turned on, then press and hold the folding key ① (see Picture3-1) for 3 seconds, release the button when the LED lights are on and there is a beep sound. Press and hold the unfold key ② for 3 seconds to unfold the wheelchair.Press key ③ to stop folding or unfolding.
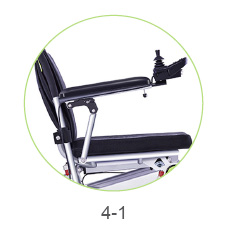
4. Install the controller
Install the controller when the wheelchair is unfolded. The controller can be mounted either on the left or right armrest (see Picture4-1) according to the users'need. Fix the controller cable with the plastic tie. Sit on the wheelchair, turn on the power switch on the controller ④ (see picture 4-1) and ready to drive.
Notes:
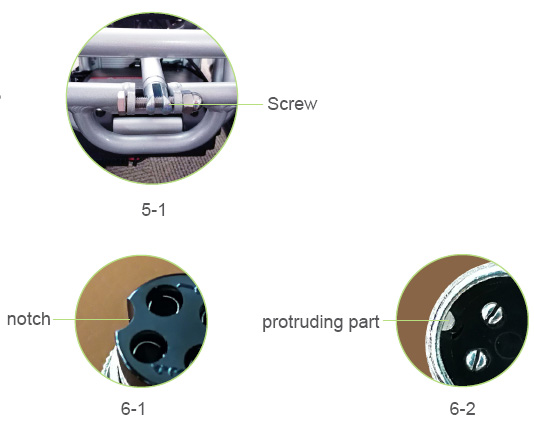
If the wheelchair cannot be folded automatically due to a malfunction of the electrical parts, please use the given tools to remove the screws located at the rear of the wheelchair (see Picture 5-1) to fold/unfold it manually.
Please connect the charger to the wheelchair before connecting it to the AC power while charging. Please align the notch on the charger (See Picture 6-1) with the protruding part of the charging port (See Picture 6-2), insert and tighten the fixing cap for connection. Please loosen the fixing cap before removing the charger from the wheelchair.
1.This product is designed for user's simple operation.
2.The reducer with dual back drivers is used to ensure the stability and reliability of driving.
3.Advanced controller, easy operation system.
4.Seat design complying with Human Engineering provide user with enough coziness.
5.The whole H3S could be folded and the pedals could be dismantled, easy for package, delivery and storage in household.
Tip: Please turn off power to prevent the battery from over-discharging if riders don't use it.
Main Technical Parameters
| Size | 1100X620X980mm |
| Item weight | ~35kg |
| Folding size | 890X620X400mm (controller size not included) |
| Max. load | 130kg |
| Rotation radius | 1.2m |
| Frame | Aluminum alloy 6061 |
| Standard max. speed | 6Km/h |
| Climbing capacity | about 8° |
| Braking performance | ≤ 1.5m |
| Slope capacity | about 8° |
| Charging time | about 5H |
| Battery | lithium 25.2V 524Wh |
| Reduction gearbox | worm and gear reduction ratio 1: 32 |
| Applicable temperature | -15℃ ~50℃ |
| Over-obstacle capacity | <40mm |
| Trench crossing capacity | <100mm |
| Front wheel | 8 inch |
| Rear wheel | 12.5 inch, inflatable tire |
| Motor | Dual-drive brush motor with clutch pull rod. Power: 200W; voltage: 24V; revolving speed: 3776rpm |
| Automatic folding function | a key to automatically contract and extend |
Warning
Please do not throw away the waste battery, so as not to pollute the environment. The waste lithium battery of the product is to be recycled by the enterprise or dealer, and the government designated outlets.
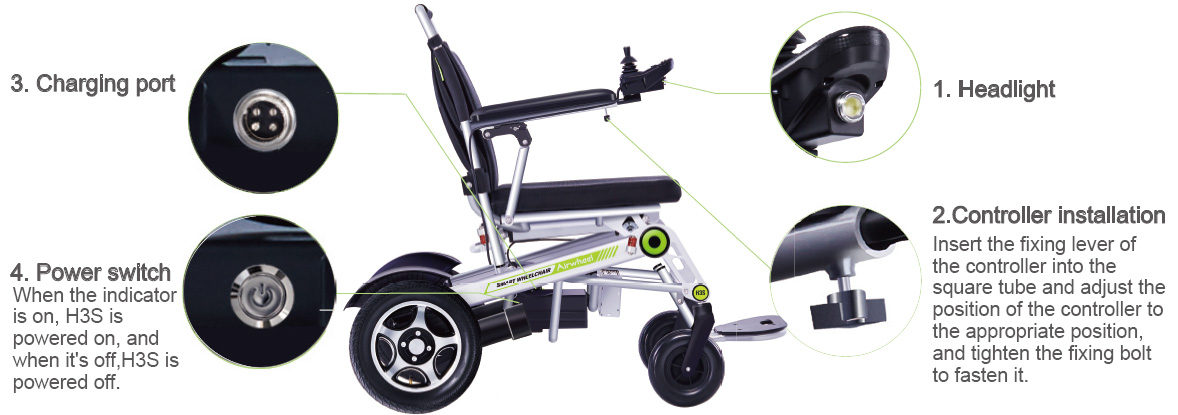
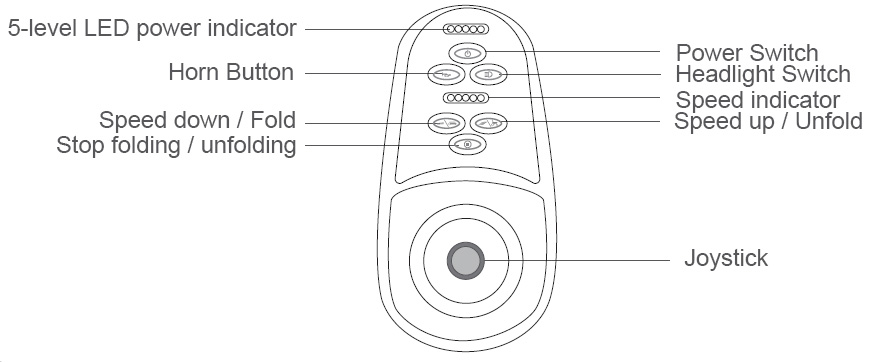
Power Switch
Make sure the power button on the battery box is turned on and the wheelchair is unfolded, then press the power switch on the controller to be ready to drive or remote control. Press it again to shut down the ready mode.
Note: The power switch on the controller cannot be turned on when the wheelchair is completely folded. Please turn on the power on the battery box first, unfold the wheelchair, and turn on the power switch on the controller to be ready to drive.
Headlight switch
Make sure both the power on the battery box and on the controller are turned on, then press the headlight switch to turn on the headlight, and press it again to turn off.
Horn Button
Press the button the buzzer will buzz; Release the button, the buzzer stop buzzing.
Speed down / Fold
In the power-off state, press the button over 2 seconds, the H3S enters the extending/contracting mode. Release it to contract.
In the extending/contracting mode, click the button to stop contracting if it is contracting. When extending stops, click it to contract.
In the ready mode, remote control mode and riding mode, click the gear button to decrease one gear.
Speed up / Unfold
In the power-off state, press the button over 2 seconds, the H3S enters the extending/contracting mode. Release it to extend.
In the extending/contracting mode, click the button to stop extending if it is extending. When contracting stops, click it to extend.
In the ready mode, remote control mode and riding mode, click the gear button to increase one gear.
5-level LED power indicator
It shows the percentage of the remaining battery capacity. Each LED light represents 20% of the battery capacity. The LED lights will be off one by one after consumed every 20% of the battery. For example, it means 40% battery consumed already when two LED lights are off. Better charge the battery when 2 or 3 LED lights are off to prolong the battery life. It is prohibited to drive the wheelchair when there is only one LED light on, otherwise, it will cause damage to the battery due to over-discharge. The accuracy of the power indicator will decrease after daily use.
Stop folding / unfolding
In the extending/contracting mode, click the button to stop extending or contracting. It enters the shutdown state.
Speed indicator
Press the speed up button, the LED lights of speed indicator will be on one by one.
Press the speed down button, the LED lights of speed indicator will be off one by one.
Shutdown state: the circuit connection is complete, the power switch in the battery pack is turned on. But the on-off button in the control box isn't pressed and the indicator light isn't on.
Standby state: press the on-off button in the control box, the indicator light will be on, but without any manmade operation.
Riding state: press the on-off button in the control box, the indicator light will be on, and use the operating lever to make it move.
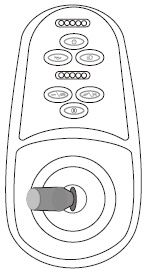
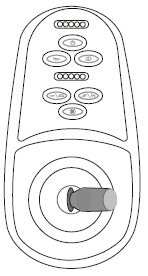
The controller controls H3S to go forward, backward, and turn left and right, and to accelerate, decelerate and brake. After turn on the switch button, push the rod forward vertically and H3S moves forward. More forward, the faster the speed. Release the rod to slow down and when fully released, the rod is reset and H3S stops and is in the braking state. Pull the rod backward, H3S moves backwards, more backward, the faster the speed to backward.Release the rod to slow down and when fully released, the rod is reset and H3S stops and is in the braking state.
Similarly, turn the rod to left or right, H3S will turn left or right. Pushing more left or right, the faster the speed towards left or right. Release the rod to slow down and when fully released, the rod is reset and H3S stops and is in the braking state.
Forward: Push the operational rocker forward and the H3S will move forward.
Pull the operational rocker backward and the H3S will move backward.
Leftward: Push the operational rocker leftward and the H3S will move to the left.
Rightward: Push the operational rocker rightward and the H3S will move to the right.
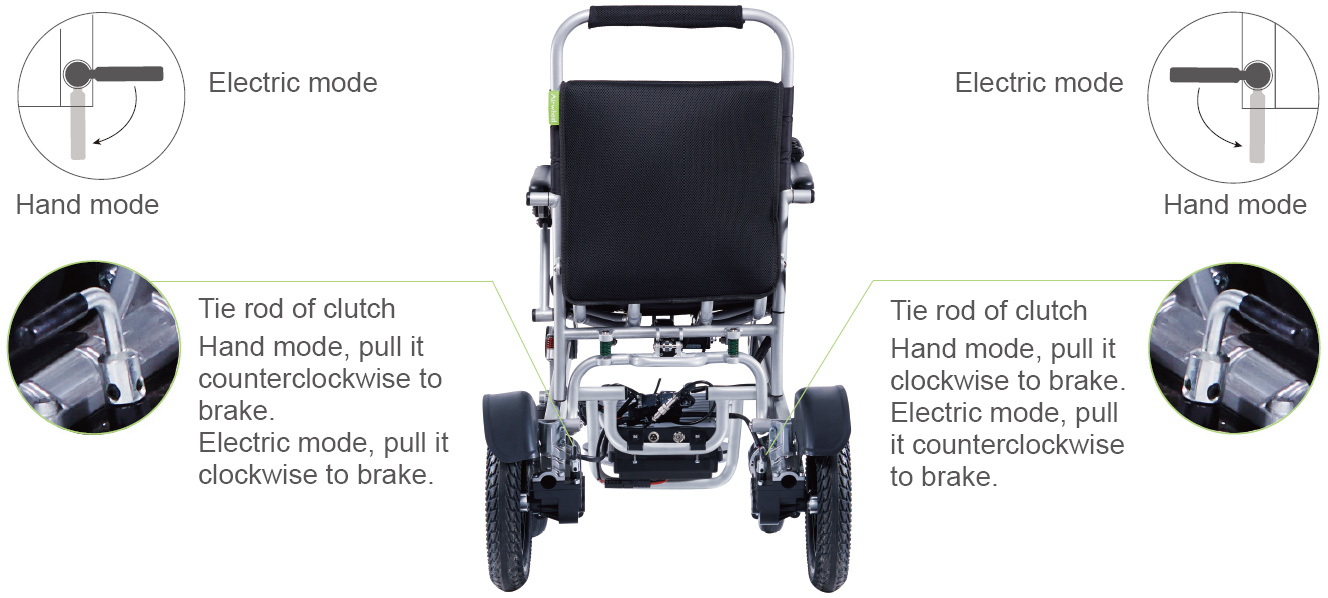
Pull the tie rod to the open position, then the brake of H3S will not work, the weelchair can be pushed by people(no matter the H3S is power on or power off, people can do it), when people pulf the tie rod to the close position, nobody can push the H3S.
Warning
The clutch lever must be in electric mode, it means the H3S is braking, people can drive the H3S. To ensure the security of people and H3S.it is prohibited to use this function when the H3S uphill or downhill.
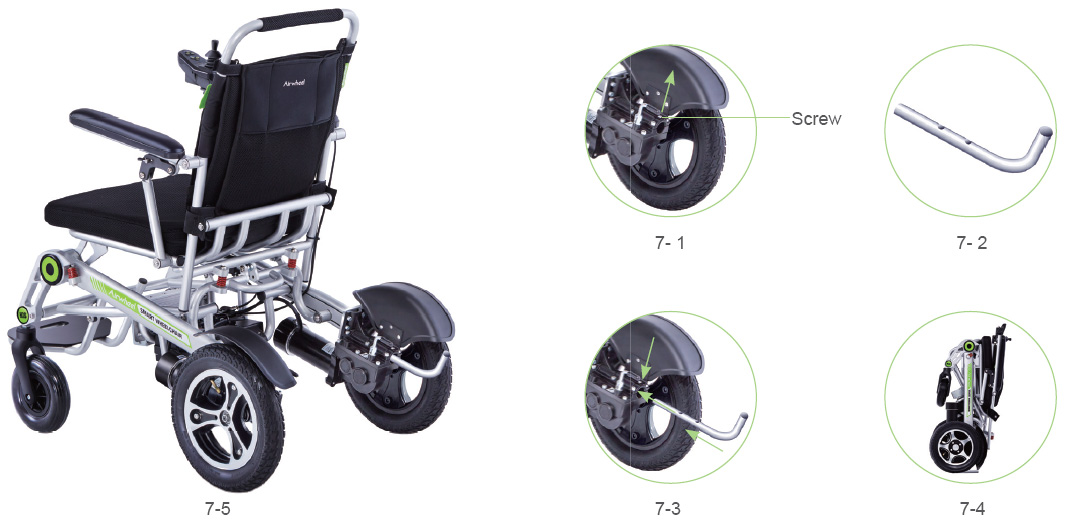
Assemble the stand
oosen the screws on the top of the motor (see Picture 7-1), take out the stand (see Picture 7-2), insert it into the motor holes, and then tighten the screws. Same process for assembling the other stand (see Picture 7-5). The use of H3S stand (see Picture 7-4)
Please read User Manual carefully and follow riding requirements during the H3S ride. Please do not use it until riders have read User Manual carefully and learned the performance well. Do not lend it to those who cannot manipulate H3S.
Important Note:
You need lots of practice to grasp the skill before you ride H3S safely. If you are not skilled, or fail to follow the user guide of this product, it may cause rider or others injury or property loss. Our company only takes the responsibility for product defects or damage, and we are NOT responsible for physical injury or property loss related with using products.
Attentions before operation:
1. Get familiar with local traffic rules.
2. H3S belongs to non-motor vehicle, being designed especially for the old and the people with mobility problem. No driving license is needed in accordance with traffic law, but driver of H3S should observe the same traffic rules that are applied to pedestrians. Please drive H3S in pedestrian lane or bike lane.
① Get familiar with all the traffic signals marks used for pedestrians.
② Do not turn direction or cross road suddenly when driving on road.
3. Operation Practice.
Before your first time to operate this H3S, please get familiar with all the functions of this vehicle. Practice the operations like moving forward, increasing speed, reducing speed, stopping, moving backward, moving uphill, moving downhill and turning direction in a safe pace with less people and good road condition. Then you can officially drive on road after getting familiar with all these operations.
4. If possible, please find a person familiar with this H3S to accompany you to ensure your safety during first onroad operation.
5. Do not drive the H3S after you drink, are exhausted or are not consciously clear to guarantee your safety.
6. Please confirm that the operator of this H3S is not suffered from any mental disease or other diseases that may attack during driving and result in the driver's incompetence of driving the vehicle safely.
7. If you are taking medicine, please confirm from your doctor that if such medicine will have adverse influence on your ability to operate the H3S.
8. Check the vehicle condition to confirm if the brake and various properties are normal, if the seat is locked and ift the charge volume is enough.
9. Do not refit this H3S without the authorization of our company
Warning
·Never expose the electrical system of this vehicle to humid environment (such as rain, snow or fog), do not wash this vehicle with water, which will damage the electrical system. If the H3S is wet, it could only be used after being dried and confirmed for good condition.
·Do not drive the H3S under hostile weather conditions, such as rain, snow, fog, strong wind, temperature lower than -20℃ or higher than 40℃ .The electrical system may be damaged under those conditions to cause failures in control.
·Do no drive the H3S on desert, beach, muddy road, road with pooled water, iced road, too smooth road or saline and alkaline land to prevent the driving property of this vehicle.
Attentions during Operation:
1. H3S is designed with only one seat not allowing for taking passengers.
2. H3S is not intended to be used for moving or loading cargos.
3. The operator should sit on the seat and grip the handle for operation.
4. Do not drive in a zigzag manner, take a sudden turn at high speed or incline your body to prevent H3S inclination to one side.
5. Please high concentrate and drive slowly on uneven or soft road (such as grassland), when making a turn, on streets with a lot of traffic, in shopping centers or parks.
6. Do not use wireless communication devices such as mobile phone during driving. These devices could only be used when you stop the H3S in a safe place and cut off the power supply.
7. When moving backward, pay attention to road conditions and pedestrians at a slow speed.
8. Drive at a slow speed when getting out of door or elevator. It is not permitted to sit on the H3S on escalator.
9. Keep highly concentrated, fasten the safety belt and drive straightly at a slow speed when driving uphill or downhill. It is not permit to drive the H3S across slopes exceeding the limit of this vehicle.
10. Do not cross the slope exceeding 5° at a high speed.
11. Do not cross over obstacles or steps higher than 4cm, which may impede the H3S from moving forward. At this condition, release operational handle immediately.
12. Do not cross any gap wider than 10cm. Drive the H3S straightly when crossing gap less than 10 cm in width.
13. Follow traffic rules when driving through cross street and do not run a red light. When passing railway, please stop to observe the surrounding conditions, and then drive across the railway slowly in a direction perpendicular to tracks to avoid dropping into the gap between different sleepers.
14. Do not frequently lock or unlock the electrical door. Do not frequently start or stop the H3S.
15. Do not lend your H3S to anyone who is not familiar with or has never used this vehicle. Do not fet children paly with electrical door lock or operational handle.
16. Do not use this vehicle with too much load (higher than 130KG).
Warning
When you release the operation handle during driving and the handle has returned to the central position, but the H3S does not stop, please lock the electrical door as soon as possible and contact the nearest dealer.
Attentions after Operation:
1. If you are not going to use the H3S for over 48 hours, Please turn off the power switch.
2. When bring H3S to other vehicles, make sure the battery is fixed.
Battery usage:
1. Auxiliary charge: such as short delivery time, users can directly use the battery.If the delivery time is longer (2 months or longer), the battery will lose power during storage and transport. It is better to charge the battery before use. To charge it requires plugging the exclusive charge to the battery charging hole and connecting AC100-240V power source for 2~4 hours until the charger is full.
2. The normal charge of the battery: the operation of AIR is also the discharge process of the battery. The battery should be charged immediately after the use of the power-assisted vehicle. Please turn off the power if not riding.
3. The connectors of the battery box should be fixed tightly according to the requirements (the battery box connecting line has been reliably connected before ex-factory). Loosened or wrong connection will cause the related parts abnormal and lead to serious damage.
4. Lithium batteries can not be close to open fire or high temperature heat source, can not be thrown into water and can not be exposed in the sun in high temperature season.
5. Do not disassemble and decompose, as the internal part of them lithium battery has been packaged intactly.
6. The waste lithium battery of the product is to be recycled by the enterprise or dealer, and the government designated outlets. Please do not throw away the waste battery, so as not to pollute the environment.
Charger usage:
1. Carefully check whether the charger's rated input voltage (AC100-240V) and the grid voltage is consistent.
2. When the vehicle needs charging,first connect the battery to the charger, and then connect the charger to AC power source . The charging indicator is red meaning it is charging. When it turns green, it will take 15 minutes to be fully charged. The charging time is about 5 hours (depending on the quantity of remaining battery).
Matters needing attention in charging:
1. When charging, please put it in the safe place where children can not touch.
2. It is not advised to use it when it is not fully charged.
3. Do not use other brands of chargers, and other brands of batteries are not suitable for the use of the charger.
4. Do not disassemble, as the charger contains high voltage circuit.
5. Prevent liquid and metal particles from penetrating into the inside and be aware of falling and impact, so as not to cause damage during use and storage.
6. When charging, do not affix any items.
7. It requires to charge it fully and turn off power before storage. Charge it every three months (at most).
How to Drive this H3S:
1. The driver should fasten safety belt after sitting on the seat.
2. Press the starting button and then the 5-scale charge volume display will be on or twinkles slowly.
3. Push the rocker slowly forward until you hear the sound of electromagnetic brake. At this time, the H3S should move forward. Similarly, push or pull the rocker backward/leftward/rightward, the H3S will move backward/leftward/ rightward.
4. Adjust the speed scale button to regulate driving speed according to road condition, surrounding conditions and personal preference.
5. When you want to stop, release the operational rocker and it will turn to central position. Then you could hear electromagnetic sound soon, it means that the H3S is braking steadily.
6. Pay attention to surrounding conditions when moving backward. Slowly pull the rocker backward and the H3S will move backward.
Airwheel reserves the right of final interpretation of all the terms and conditions of this User Manual.
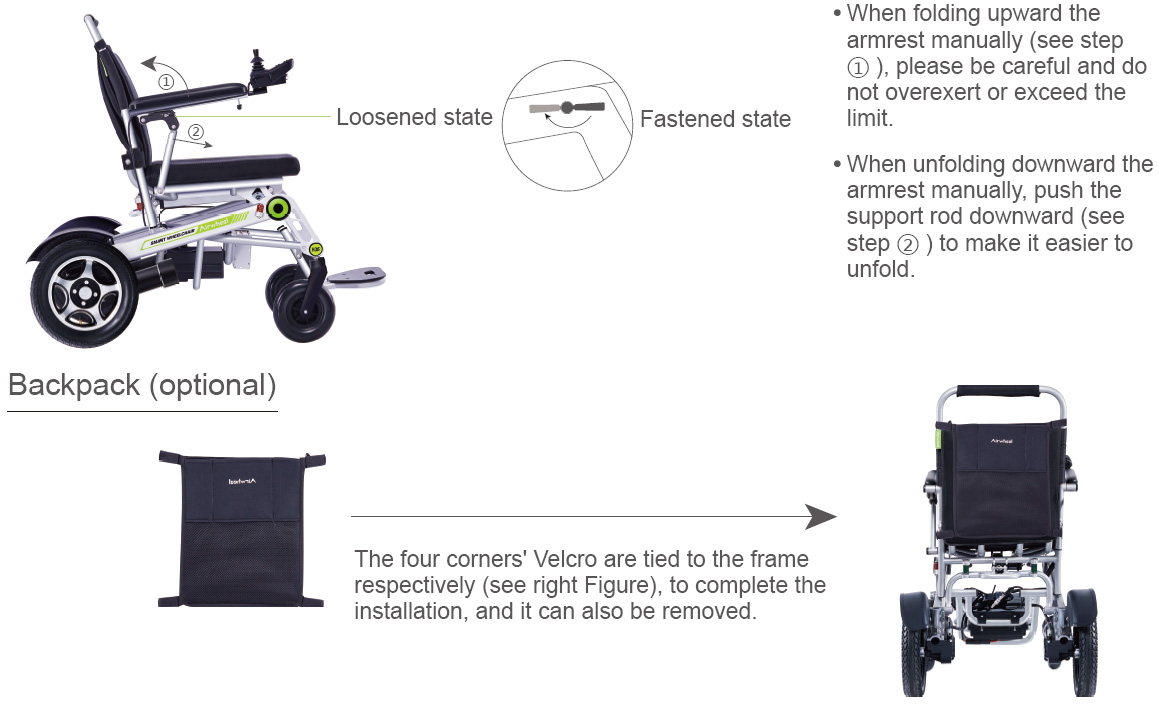
Notes on folding armrest manually:
Scan QR code to download
*Applicable to Android 4.3 or higher, iOS 7.0 or higher.
APP Instructions
1. Turn on H3S power button, and start App as well as Bluetooth.
2. Click the search button and do as the follows to connect (verify password is 11111111).
3. Refer to official website or give calls for details.
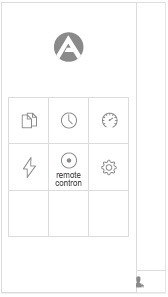
Click the Intelligent scooter in the App interface.
Click the search
button or  .
.
Search Airwheel nearby,click the searched Airwheel model to connect.
Input the verify password: 11111111 to connect.
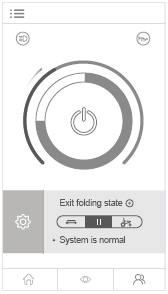
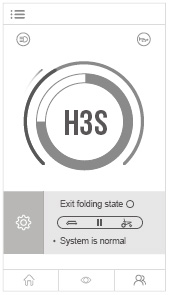
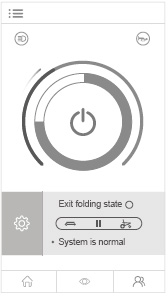
Power on and enter the home page
Click the headlight button
to turn on the headlight  .
Click the buzzer button
.
Click the buzzer button  ,
buzz sound will be heard.
,
buzz sound will be heard.
When H3S is powered off, click
the contracting button  and it
will contract automatically. Click
the extending button
and it
will contract automatically. Click
the extending button  and it
will automatically extend. Click
the stop button
and it
will automatically extend. Click
the stop button  , it will stop
contracting or extending.
, it will stop
contracting or extending.
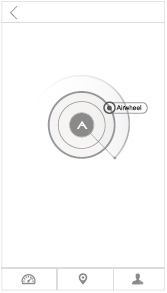
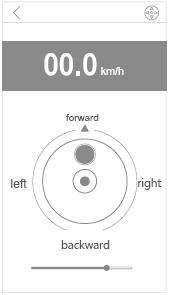
When the icon-H3S showing on the home page, it means it is ready to be ridden.
Click the main
interface button  to open the sidebar.
Click the button  in the
sidebar to open the remote
control interface.
in the
sidebar to open the remote
control interface.
Move the button  to operate
the intelligente scooter going
forward, backward or turning.
to operate
the intelligente scooter going
forward, backward or turning.
Slide the control speed  and click the icon
  to
switch to the handoperationmode.
to
switch to the handoperationmode.