1. Check Packing Contents

Packing list
| Bike body | 1 pcs | Tool | 1 unit |
| Charger | 1 pcs | Saddle components | 1 unit |
| Battery holder | 1 pcs | Pedal | 1 unit |
| Instruction | 1 unit |
Packing list
| Bike body | 1 pcs | Tool | 1 unit |
| Charger | 1 pcs | Saddle components | 1 unit |
| Battery holder | 1 pcs | Pedal | 1 unit |
| Instruction | 1 unit |
Main Technical Parameters
| Size | 1290mm×550mm×1100mm |
| Item weight | ~17kg |
| Folding size | 840mm×470mm×650mm |
| Max. load | 100kg |
| Tire size | 14 inch |
| Max. speed | ≤ 20km/h |
| Charging voltage | AC100-240V 50-60Hz |
| Applicable temperature | -10℃ ~40℃ |
| USB output voltage | 5V |
| Charging time | About 180/360min |
| Max. Permissible Gradient | ~15° |
| Range | ≥ 25km |
Main Technical Parameters Of Storage Battery
| Storage battery type | Lithium battery |
| Nominal voltage | 36V |
Main Technical Parameters Of Motor
| Motor type | Brushless motor |
| Nominal voltage | 36V |
| Continuous power output | 230W |
| Rated output torque | 5.7N.M |
| Rated speed | 380r/min |
Main Technical Parameters Of Controller And Charger
| Undervoltage protection value | ≥ 30.5V |
| Over-current protection value | ≤ 18A |
Warning
Please do not throw away the waste battery, so as not to pollute the environment. The waste lithium battery of the product is to be recycled by the enterprise or dealer, and the government designated outlets.
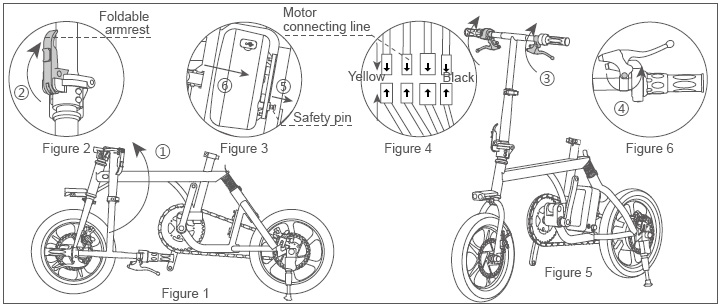
1. Take R3 out of the package bag, unfold pedals and kickstand. Push the head in vertical direction (see Figure 1 - ① arrow), the folding handle along with the bike head is to be down-and-backward to the slot and then button up (see Figure 2- ② arrow) to fasten the head. Rotate the brake to horizontal (see figure 5- ③ arrow), tighten the screws on the brake to fix brake (Figure 6- ④ arrow). Pull the safety pin gently on the fixed seat of the battery box (see figure 3- ⑤ arrow), insert the battery box (see figure 3- ⑥ arrow), release safety pin and connect the wire as showed in Figure 4 .
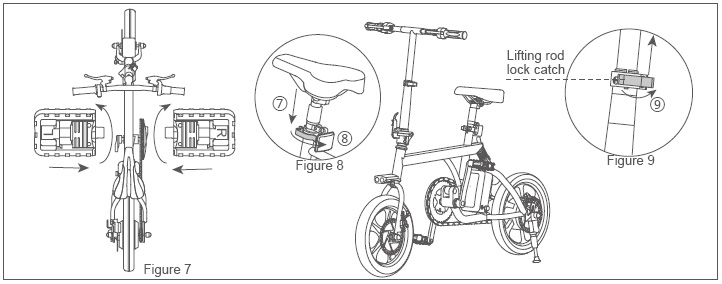
2. Install the pedals correctly (L-left, R-right) as showed in Figure 7. Please note the installation of screw tooth is the opposite. Install the left pedal anticlockwise and right pedal clockwise. 35~40N.m is the recommended torque. Adjust the saddle height and install it (see Figure8- ⑦ arrow) and close saddle's lifting rod lock (see Figure8- ⑧ arrow). Open the lifting rod lock and adjust the head height (see Figure9- ⑨ arrow) and close saddle's lifting rod lock.
R3 provides riders with three different riding modes.
1. Electricity-assisted mode
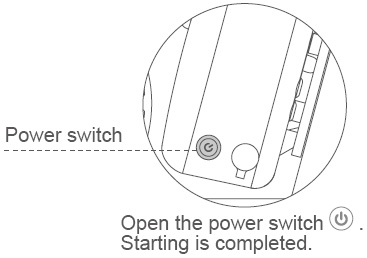
Set right the head, fold kickstand and fasten frame. Adjust bike head and saddle position to ensure a comfortable riding experience. Find the power switch in the one side of the battery, start it and hold the handle. First sit on the saddle and step on the pedals one foot by one foot. When riders are ready to ride it, they can push the accelerator in the right handle to accelerate.
2. Man-powered mode
Set right the head, fold kickstand and fasten frame. Adjust bike head and saddle position to ensure a comfortable riding experience. Find the power switch in the one side of the battery, start it and hold the handle. First sit on the saddle and step on the pedals one foot by one foot. Rides can pedal it to go forward.
3. Power-assisted mode
Turn on the power switch. Power sensor can sense the rotation, and then give signal to the controller when the riding ring exceeds three rings, so that power-assisted mode is activated. According to different riders’ force, the level of power assistance changes. When braking, it is out of power-assisted mode. If pedals reverse, it will realize a faster exit of power-assisted mode. The power-assisted mode is to make riding easier.
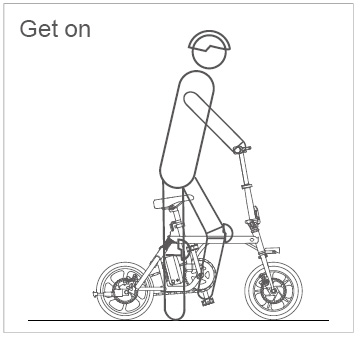
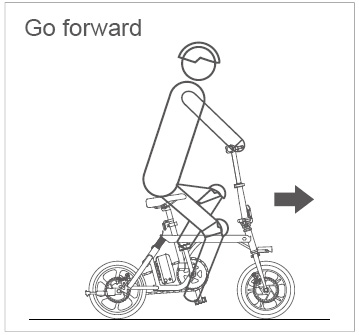
Fold the kickstand, open the power switch and step on the pedal one foot by one foot.
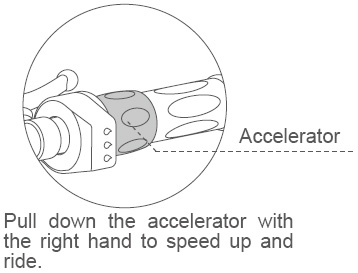
Right down to move accelerator to accelerate.
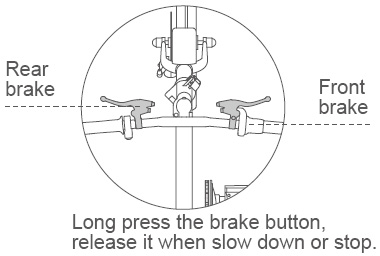
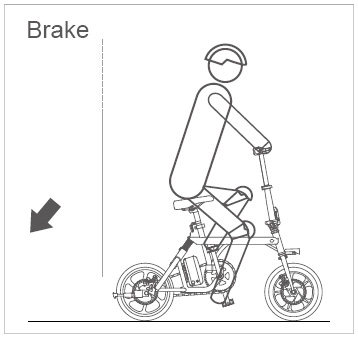
Hold the brake.
Operating steps for beginners (electricity-assisted mode)
1. Fold the kickstand and turn on the power switch. Hold the handle and sit on the saddle.
2. One foot steps on the pedal and look straight ahead. Rotate accelerator with right hand to speed up.
3. When riders need to slow down or stop R3, riders put their fingers on the brake handle, and press the brake handle hard until the scooter slows down or stops.
4. When the brake is started, the accelerator will automatically cut off power.
Warning
·Avoid using this product in bad weather conditions (e.g., rain, snow, or ice).
·Please confirm whether the brake can be used normally when riders want to use it.
Please read User Manual carefully and follow riding requirements during the R3 ride. Please do not use it until riders have read User Manual carefully and learned the performance well. Do not lend it to those who cannot manipulate e bikes.
Important Note:
No urgent acceleration, rapid deceleration and sharp turns. Do not excessively lean forward and backward. Do not over speed. When the electric quantity displays less power in the App or power switch lights flash, it is recommended that the rider stop riding. If riding, please keep a low constant speed. If there is a risk of falling, please protect personal safety first, do not consider R3. R3 may produce wear and tear which may influence on the performance in the process of riding and parking. So before riders ride the R3, it is necessary to do the following inspections:
1. Rider needs to check whether the R3 is installed firmly, and is damaged or not.
2. To install pedals, 35~40N.m is the recommended torque. Please make sure the pedals have been fastened before use. If not, the rear screw tooth will be damaged and the pedals will fall off from the bike which is not included in the Warranty.
3. Rider needs to check the brake function and tyres, and to check whether the handle and folding lock is fastened. If not, please tighten the screws.
4. Rider needs to check whether folding mechanism has been locked.
5. The chain should be tightened meaning that the distance between chain prolapse and tension is 10~15mm.
6. Brake should be reliable and flexible to reset and it should increase the braking distance in rainy, snowy and downhill riding.
7. Adjust the handlebar, saddle height, and it must not be higher than the safety points on the vertical pipe and the saddle tube. After adjustment of the horizontal pipe, the vertical pipe, saddle and saddle tube, they should be fastened, ≥ 18N.m is the recommended torque.
8. Rider needs to find an open space to practice, at least 4m*20m area, indoor and outdoor.
9. Rider needs to have a full understanding of the surrounding environment to avoid the interference from the vehicle, pedestrians, pets, bicycles and other obstacles.
10. Rider needs a skilled assistant in the side. The assistant is proficient in riding R3 and familiar with the guidelines for the use of scooters in all matters needing attention and riding method.
You need lots of practice to grasp the skill before you ride R3 safely. If you are not skilled, or fail to follow the user guide of this product, it may cause rider or others injury or property loss. Our company only takes the responsibility for product defects or damage, and we are NOT responsible for physical injury or property loss related with using products.
Parking note:
1. When you get off, the power switch should be turned off in case of pushing the accelerator by accident making it out of control.
2. The power should be turned off when parking.
3. For your riding safety and for the R3's superb condition, please maintain and clean it regularly.
Adjustment and maintenance:
1. Newly purchased vehicles should be adjusted in good condition, if there is any question, please refer to the aftersales staff.
2. The adjustment method of the brake is the same as the ordinary bicycle. The key is not only to be able to brake effectively, but also to release the brake without block (otherwise it will consume a large amount of electric energy) and make sure the brake-power off function is effective.
3. To replace tires, it is the same as ordinary bicycle. Due to the rear wheel hub and circuit, riders need to pay attention to the lines and press the two screws in the rear axle. The torque of the rear wheel is recommended ≥ 30N.m, the front wheel ≥ 18N.m.
4. Have a maintenance and a comprehensive examination every 800 km. check whether the front and rear wheel screw is locking, check whether the pattern of cover tyre is worn; check whether the tire pressure is appropriate, the drive system is smooth, and each part of the joint is normal: check whether the brake line zip-fastener is used in lubrication. And inject suitable amount of lubricant to the central axis, the front axle, rear axle, flywheel, fork, rotating parts and brake wiring. 40# oil and butter as a lubricant are recommended.
5. In the use and maintenance, if you find that you cannot solve the problem, please contact the aftersales staf.
6. Unauthorized demolition of Airwheel caused the failure and damage, is not in the company's free warranty. When the vehicle is used for a period of time, it should be requested professional or designated service station for a comprehensive inspection and adjustment to ensure the comfort, safety and normal service life.
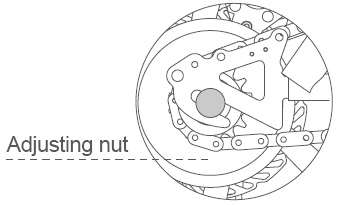
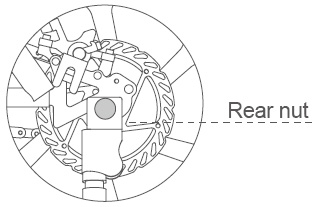
Chain adjustment:
Rotate to loosen the nuts. Adjust the nut forwards or backwards to find the suitable looseness. When adjusting the chain, it must also be aligned with the rear nut and adjusting nut and keep the front and rear wheels in a straight line. After adjustment, refasten the nut in the rear wheel, lock the adjusting nut to have a final check. The chain sag between the two chain wheels should be 10~15. Clip mouth is back to the installation.
The right side of the bike
The left side of the bike
Battery usage:
1. Auxiliary charge: such as short delivery time, users can directly use the battery.If the delivery time is longer (2 months or longer), the battery will lose power during storage and transport. It is better to charge the battery before use. To charge it requires plugging the exclusive charge to the battery charging hole and connecting AC220V power source for 2~4 hours until the charger is full.
2. The normal charge of the battery: the operation of R3 is also the discharge process of the battery. The battery should be charged immediately after the use of the power-assisted vehicle.
3. Please turn off the power if not riding.
4. The connectors of the battery box should be fixed tightly according to the requirements (the battery box connecting line has been reliably connected before ex-factory). Loosened or wrong connection will cause the related parts abnormal and lead to serious damage.
5. Lithium batteries can not be close to open fire or high temperature heat source, can not be thrown into water and can not be exposed in the sun in high temperature season.
6. Do not disassemble and decompose, as the internal part of them lithium battery has been packaged intactly.
7. The waste lithium battery of the product is to be recycled by the enterprise or dealer, and the government designated outlets. Please do not throw away the waste battery, so as not to pollute the environment.
Charger usage:
1. Carefully check whether the charger's rated input voltage (AC220V) and the grid voltage is consistent.
2. When the vehicle needs charging,first connect the battery to the charger, and then connect the charger to AC power source .The charging indicator is red meaning it is charging. When it turns green, it will take 15 minutes to be fully charged. The charging time is about 2-4 hours (depending on the quantity of remaining battery).
Matters needing attention in charging:
1. When charging, please put it in the safe place where children can not touch.
2. It is not advised to use it when it is not fully charged.
3. Do not use other brands of chargers, and other brands of batteries are not suitable for the use of the charger.
4. Do not disassemble, as the charger contains high voltage circuit.
5. Prevent liquid and metal particles from penetrating into the inside and be aware of falling and impact, so as not to cause damage during use and storage.
6. When charging, do not affix any items.
Attention:
1. Do wear helmet, gloves, elbow/knee pads or other necessary protection gears.
2. Do confirm the reliability of brake, saddle, frame, handle and wheels in case of accidents.
3. Riders should pedal it when climb bridge, ride against the wind and overload.
4. Do not ride on the bumpy and wet roads, such as earth road, cobbled road or snowing and watery roads, in case of accidents and danger.
5. Do not put items in the handles as it may be out of control.
6. R3 is only suitable for one person to ride. Do not carry person in the storage rack.
7. Do not ride Airwheel in extremely cold winter.
8. Do not ride Airwheel in the rain.
9. Don't ride overspeed in the downhill. If brake, do not use the front brake in high-speed riding, in case of danger.
10. Do not inject oil in the brake in case of braking failure.
11. Do not allow pregnant woman, children under 15 or the aged above 60 to ride Airwheel.
12. Drunk or drug riding Airwheel is prohibited. People with constrained action and reaction capacity are not allowed to ride Airwheel.
13. Do not ride Airwheel in other unadvised situations causing by either personal or objective reasons.
14. R3 is not suitable for long-distance travel.
15. Develop good habits to charge in time. Before ride, please ensure R3 has enough electricity. It is very important to form the habit of charging in time every day so that the battery can serve you a longer period of time.
16. Almost all kinds of batteries will be affected by the environment. In general, the electric discharge performance is better when the air temperature is high. When the temperature drops to 0 degrees centigrade, battery power may fall more than 1/3. So, in winter or in cold area, mileage reduction is normal. When the temperature rises to 20 degrees above, the range will recover.
17. Do not insert metal objects (such as wires, keys etc.) into the battery charging hole or put in the +/- contact, so as to avoid the short circuit of the battery, ignition and safety loopholes.
18. Do not use other brands chargers and accessories or there may occur accidents and Airwheel is not responsible for the accidents.
19. Lithium batteries cannot be close to open fire, and flammable and explosive corrosive gases.
20. Do not disassemble and decompose the battery, so as not to damage the internal parts.
21. It is strictly prohibited to use wire or conductor to connect the battery, so as to avoid danger and damage to the battery.
22. The lithium battery should be handled with care, to avoid accidents.
23. To charge, first connect the battery charge interface, then the power source.
24. It needs power off to store. It needs to charge no more than 3 months and then store it.
25. The company shall not be liable for any loss or damage resulting from self-refit and self-repair, which may cause you to lose your free warranty scope. If something goes wrong, please contact aftersales personnel.
26. This product might be limited to use on private road (check the regulations in force in the territory of use). We recommend using suitable protective equipment.
Airwheel reserves the right of final interpretation of all the terms and conditions of this User Manual.
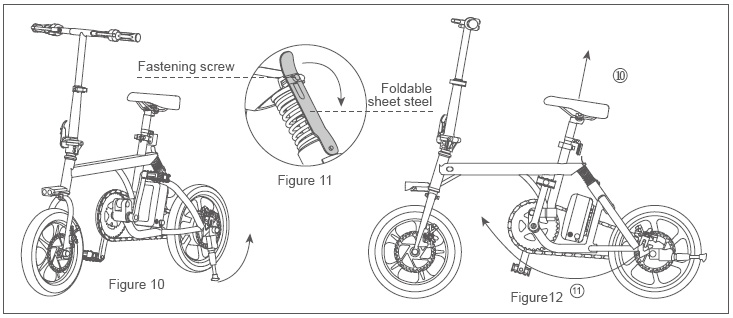
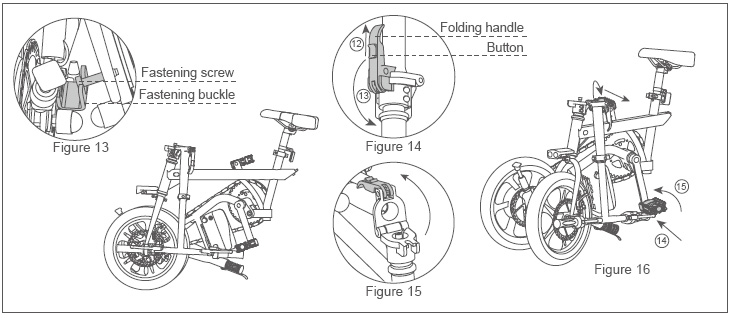
1. Adjust the heights of the bike head and saddle to the lowest and fold the kick-stand (see figure 10). Open the folding steel sheet to separate the folding steel sheet and fastening screw (see Figure 11). Pull the saddle up (see figure 12- ⑩ arrow) and rotate forward the rear wheel to fold (see figure 12- 11 arrow).
Put the fastening screw in the fastening buckle (see Figure 13). Push up the button on the handle (see figure 14- 12 arrow) and fold down the folding handle(see figure 14- 13 arrow). Fold the head as shown in Figure 15. Push the pedal up and inward (see figure 16- 14 arrow and 15 arrow) to fold the pedals.
Scan QR code to download
*Support Android 4.3 or higher, iOS 7.0 or higher.
APP Instructions
1. Turn on R3 power button, and start App as well as Bluetooth.
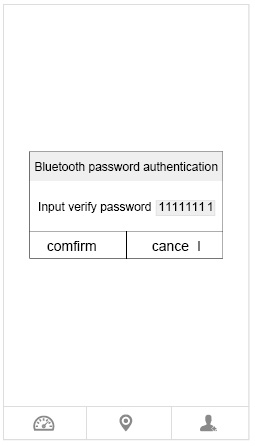
2. Click the search button and do as the follows to connect (verify password is 11111111).
3. Refer to official website or give calls for details.
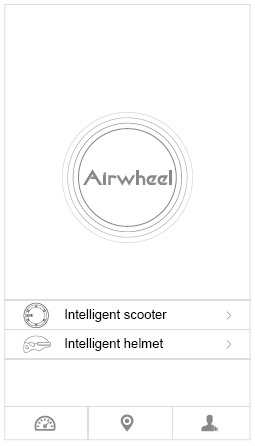
Click the Intelligent scooter in the App interface.
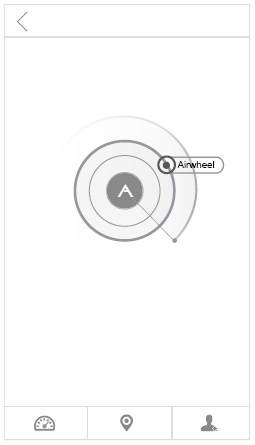
Click the search button
or  .
.
Search Airwheel nearby, click the searched Airwheel model to connect.
Input the verify password: 11111111 to connect.